Below is a basic workshop on audio editing using Apple's Garageband that I have given at Florida International University's Digital Media Department. The workshop is intended for students with little audio background. I will add the images soon.
BASIC SOUND DESIGN:GarageBand Workshop
BASIC TERMS, Layman Style:
Panning - Sound moves from one speaker to another. In a stereo setup, that means it pans from your right ear to your left
Distortion - Volume Levels are too high (in the red)
Clipping - In the digital world, that means you sounds are distorting, causing a slight "click" sound that sometimes is hard to catch, but signals amateur a mile away
Track - Where you place your sound clips
MIDI - the universal computer language instruments use to talk to each other and the computer. MIDI has its own cables. To connect to the computer you need a USB interface, or you can just buy the special "apple" keyboards online. So convenient.
Audio Track - where the live sound, special fx, anything non-MIDI goes. If your computer has a mic in, you can even record instruments live with the right cables (like your guitar, ex.) but distortion is killer!
Mixing - taking raw sounds and tweaking/fixing them
Wet Mix - a mix with effects
Dry Mix - a mix without effects
Compression - in audio, reducing the signal volume to a predetermined level set by you
Patch - a term referring to the type of software instrument you select.
EQ - Equalization. Allows you to change the frequency volumes. Someone with a low voice will need the EQ set for lower settings than someone with a high voice. There is an option to erase the hiss (a high-pitched noise often associated with cassette recordings) and the hum (the frequency of your computer, the A/C, etc. that bleeds into your recording). Play with the EQ of your voice and see how it changes sounds.
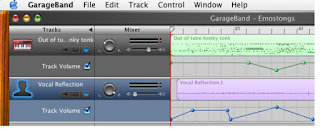
TO START:
1) Select Track/New Track/ then choose if you want a REAL or SOFTWARE instrument. Hit OK. A REAL instrument would be the USB mic. SOFTWARE instrument is the MIDI keyboard. GarageBand has a music keyboard that corresponds to the typing keyboard.
2) Double Click on track to change settings. After you change the settings, you will probably want to Save as Instrument to create a preset for later mixes. We will go over the effects in class.
3) To record, select a track. Under control decided if you would like a metronome (which clicks the time) and a Count-inHit (which gives you four beats before you start. Highly recommended). Select the red record button and play. When you are done, hit the stop button.
4) Editing the audio track. Follow basic shortcuts (apple C = Copy; Apple V = paste). These are under Edit. Apple T = Split track. Really helpful when only one word or note needs to be erased in an audio track. You can adjust volume and pan settings. Change the effects by double-clicking the track name. Remember to WATCH THE RED and adjust levels accordingly. This is where COMPRESSION comes in handy.
5) Editing the MIDI. Double-click on track and the below screen pops up. The little boxes are individual notes. You can move them up and down if you missed a note. You can copy/paste them, change their length, etc. FIX TIMING will correct imperfections in time. Usually by setting it to a 16th note, you can fix everything to your liking. This is music theory here, so if you need help, ask a musician. (No relation to ask a ninja). If you want to transpose and you don't know music, move it in increments of 12. This moves it an octave up or down. Other increments may sound cool, but you may end up sending your piano into a different key than your singer (American Idol in reverse). Velocity is a fancy word meaning the VOLUME of a note.

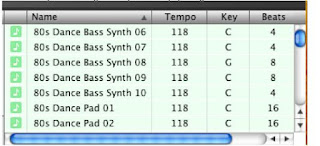
6) And LOOPS! Hit the EYE icon and a plethora of loop possibilities will come your way. Narrow down your search (ex. Drums with an Intense World beat) and loops will appear. The music note on the side means it is MIDI (you can adjust it in the MIDI panel. GREAT if you want to change things up... which is the mark of a pro). If an AUDIO signal is next to the name, then you can only fix it like the REAL instruments. Just drop the loop into the appropriate track type.
- TEMPO is the speed of the loop. Everything must be the same tempo. A 118 drum track will not line up with a 120 piano loop. You can set your overall tempo in the Play/Record panel.
- The KEY is which scale the piece is in. Once again, unless you know your music theory, you are going to want to keep the KEY the same, though with a little experimentation, you will find some other neat mixes (like C and G, C and E flat, C and F#).
- Beats tells you how long the loop is. Most pop songs are in increments of Four.
7) HOW TO UNCHEESE YOUR LOOPS! Ok, so most live musicians (as opposed to decomposing ones) think loops suck when in the wrong hands. Little Joey says "Hey I like drum loop 9, so let me use it for the next THREE HOURS of track. In fact, let me use it for every track. Bad news, Garageband is popular, so guess what, there are THOUSANDS of other people out there mixing with Drum Loop 9. Visual equivalent - How many movies have the dum blonde being hacked to pieces by an axe murderer after she slowly goes down the stairs in her nightgown calling "Is anyone there?" The same thing happens in music, which is why you don't want to use popular songs for your serious works (unless you have a special relationship with that musician and copyright, etc.). It's great for quick homework assignments or something fun for your friends to see, but in the serious world, yeah, no.
1) Create a wet and dry mixes of the loop. Duplicate the track and edit the loop instrument with different effects, reverb, echo, etc. Then go back and forth in the volume between the tracks.
2) After three of the same drum loop, insert a different loop with the same tempo. It's called a "fill" in music terms. You know, when the drummer goes nuts a sec.
3) Get a musician to play an original track over the loop. If you don't play, find a friend that does. It will help you out tremendously!
4) Silence is golden and less is more.
5) With the instrument loops (piano, strings), they are REALLY REALLY overused quickly. Use them once and try to create making a combination of several of them. If you figure out the transposition, you can actually compose some farely interesting tracks with the loops. KEEP IT INTERESTING AND CHANGE THINGS UP AND YOU WILL HAVE A SUCCESSFUL SOUNDTRACK!
BASIC SOUND DESIGN:GarageBand Workshop
BASIC TERMS, Layman Style:
Panning - Sound moves from one speaker to another. In a stereo setup, that means it pans from your right ear to your left
Distortion - Volume Levels are too high (in the red)
Clipping - In the digital world, that means you sounds are distorting, causing a slight "click" sound that sometimes is hard to catch, but signals amateur a mile away
Track - Where you place your sound clips
MIDI - the universal computer language instruments use to talk to each other and the computer. MIDI has its own cables. To connect to the computer you need a USB interface, or you can just buy the special "apple" keyboards online. So convenient.
Audio Track - where the live sound, special fx, anything non-MIDI goes. If your computer has a mic in, you can even record instruments live with the right cables (like your guitar, ex.) but distortion is killer!
Mixing - taking raw sounds and tweaking/fixing them
Wet Mix - a mix with effects
Dry Mix - a mix without effects
Compression - in audio, reducing the signal volume to a predetermined level set by you
Patch - a term referring to the type of software instrument you select.
EQ - Equalization. Allows you to change the frequency volumes. Someone with a low voice will need the EQ set for lower settings than someone with a high voice. There is an option to erase the hiss (a high-pitched noise often associated with cassette recordings) and the hum (the frequency of your computer, the A/C, etc. that bleeds into your recording). Play with the EQ of your voice and see how it changes sounds.

TO START:
1) Select Track/New Track/ then choose if you want a REAL or SOFTWARE instrument. Hit OK. A REAL instrument would be the USB mic. SOFTWARE instrument is the MIDI keyboard. GarageBand has a music keyboard that corresponds to the typing keyboard.
2) Double Click on track to change settings. After you change the settings, you will probably want to Save as Instrument to create a preset for later mixes. We will go over the effects in class.
3) To record, select a track. Under control decided if you would like a metronome (which clicks the time) and a Count-inHit (which gives you four beats before you start. Highly recommended). Select the red record button and play. When you are done, hit the stop button.
4) Editing the audio track. Follow basic shortcuts (apple C = Copy; Apple V = paste). These are under Edit. Apple T = Split track. Really helpful when only one word or note needs to be erased in an audio track. You can adjust volume and pan settings. Change the effects by double-clicking the track name. Remember to WATCH THE RED and adjust levels accordingly. This is where COMPRESSION comes in handy.
5) Editing the MIDI. Double-click on track and the below screen pops up. The little boxes are individual notes. You can move them up and down if you missed a note. You can copy/paste them, change their length, etc. FIX TIMING will correct imperfections in time. Usually by setting it to a 16th note, you can fix everything to your liking. This is music theory here, so if you need help, ask a musician. (No relation to ask a ninja). If you want to transpose and you don't know music, move it in increments of 12. This moves it an octave up or down. Other increments may sound cool, but you may end up sending your piano into a different key than your singer (American Idol in reverse). Velocity is a fancy word meaning the VOLUME of a note.


6) And LOOPS! Hit the EYE icon and a plethora of loop possibilities will come your way. Narrow down your search (ex. Drums with an Intense World beat) and loops will appear. The music note on the side means it is MIDI (you can adjust it in the MIDI panel. GREAT if you want to change things up... which is the mark of a pro). If an AUDIO signal is next to the name, then you can only fix it like the REAL instruments. Just drop the loop into the appropriate track type.
- TEMPO is the speed of the loop. Everything must be the same tempo. A 118 drum track will not line up with a 120 piano loop. You can set your overall tempo in the Play/Record panel.
- The KEY is which scale the piece is in. Once again, unless you know your music theory, you are going to want to keep the KEY the same, though with a little experimentation, you will find some other neat mixes (like C and G, C and E flat, C and F#).
- Beats tells you how long the loop is. Most pop songs are in increments of Four.
7) HOW TO UNCHEESE YOUR LOOPS! Ok, so most live musicians (as opposed to decomposing ones) think loops suck when in the wrong hands. Little Joey says "Hey I like drum loop 9, so let me use it for the next THREE HOURS of track. In fact, let me use it for every track. Bad news, Garageband is popular, so guess what, there are THOUSANDS of other people out there mixing with Drum Loop 9. Visual equivalent - How many movies have the dum blonde being hacked to pieces by an axe murderer after she slowly goes down the stairs in her nightgown calling "Is anyone there?" The same thing happens in music, which is why you don't want to use popular songs for your serious works (unless you have a special relationship with that musician and copyright, etc.). It's great for quick homework assignments or something fun for your friends to see, but in the serious world, yeah, no.
1) Create a wet and dry mixes of the loop. Duplicate the track and edit the loop instrument with different effects, reverb, echo, etc. Then go back and forth in the volume between the tracks.
2) After three of the same drum loop, insert a different loop with the same tempo. It's called a "fill" in music terms. You know, when the drummer goes nuts a sec.
3) Get a musician to play an original track over the loop. If you don't play, find a friend that does. It will help you out tremendously!
4) Silence is golden and less is more.
5) With the instrument loops (piano, strings), they are REALLY REALLY overused quickly. Use them once and try to create making a combination of several of them. If you figure out the transposition, you can actually compose some farely interesting tracks with the loops. KEEP IT INTERESTING AND CHANGE THINGS UP AND YOU WILL HAVE A SUCCESSFUL SOUNDTRACK!


Comments